RESTORATION
of AC's post-war 2 Litre SaloonPage 5
Timber repairs (rear half)

Additional sound wood needs to be cut away during a repair, so that the new piece to be spliced in is not too complex in shape. You will have to assess whether the repaired part will be stronger if you cut away a lot of original wood and make the new repair piece larger, or the other way around? The grain of the repair piece needs to be aligned correctly, and on curved sections it might even improve the strength over the original construction. As with most joints on the wood frame, new pieces spliced into old components should be glued and screwed. It's the "belts and braces" approach to reliable strength, and the glue is important to keep out water and to create a relatively stiff joint. Unglued joints will flex and maybe become slack, and in some cases rot away again.
As mentioned on a previous page, you should use suitable hardwood timbers for these repairs, ideally ash. Beech was also used a lot by AC, although this is more prone to splitting.
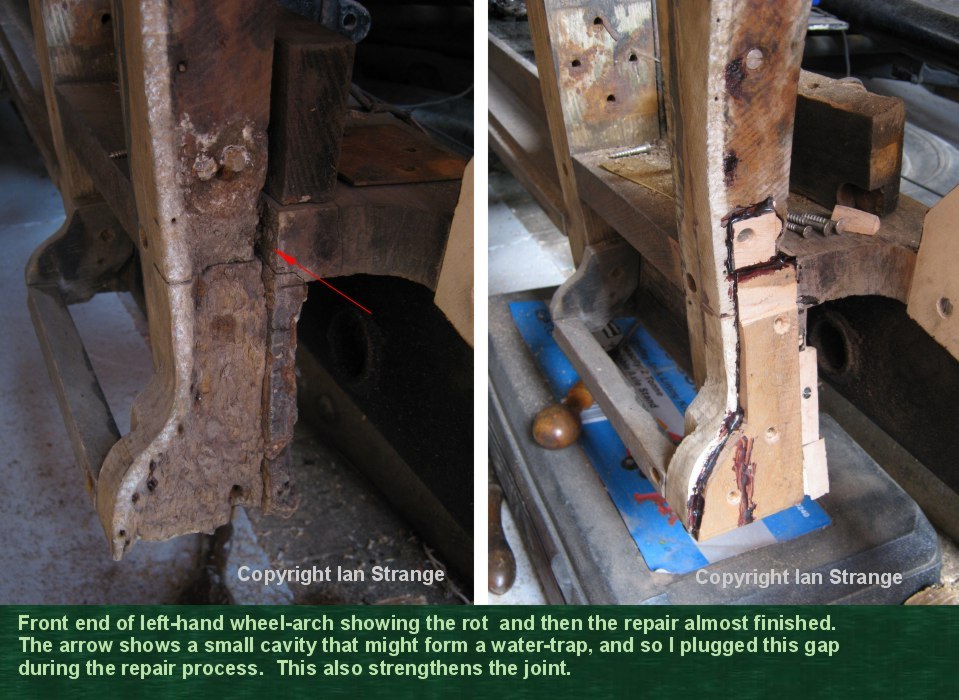
One added problem was that AC left gaps in many joints when building the cars, especially gaps to the sides of pieces. This might create water traps, but certainly makes for weaker joints. Sometimes it will allow water in, rot to start, and screws to rust and snap when disturbed.
For general tips on making joints, see the "Tips for wood frame restoring" page.
Boot (trunk) framework

The worst of the rot here will be around the wheel arches and the large rear cross-member (especially where they meet at the two bottom rear corners of the car). Also at the bottom corners of the boot lid surround. With the plywood panels removed, you can tackle the rear cross-member and splice in new wood around each joint. The big screws holding the wheel-arches to the ends of the cross-member are fitted from the outside and are only accessible with the bodyshell removed. If this area has rotted badly, then dismantling is easier, and the joint can be modified if you are working with the bodyshell in place.
Some of the little corner pieces that form the rounded corners of the boot lid opening and spare wheel door opening, are likely to need remewing. The repaired boot framework may actually raise the rear shelf/roof etc. slightly, and also straighten the curvature of the boot profile back to how it should be. I made a wooden gauge to check this curvature and the left and righthand sides of the car matched better after repairs.

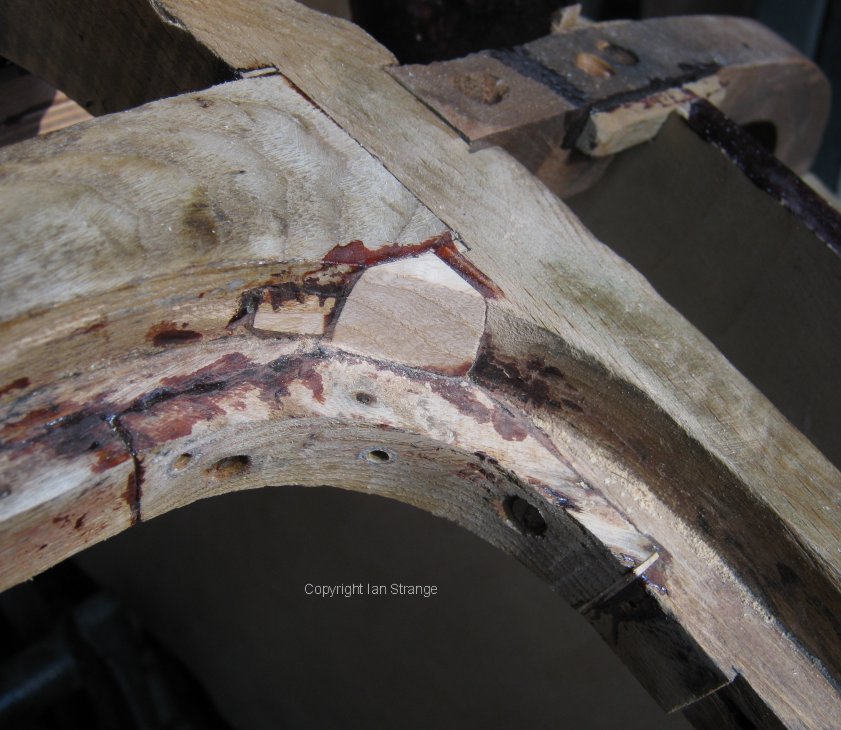
The photo above shows the top/right corner of the boot-lid opening. There are two separate corner pieces, and the smaller one has been renewed (and a small repair to the left of it is also visible).
Side-frames
The rot on the side frames will be mainly around the front half of the wheel-arch and also underneath the side windows. The woodwork under each side window is actually double-layered and if water gets passed the window seals, then it might get into the joint between inner and outer layers. This double layer also forms the top of the wheel-arch providing another weakness. Rot can start from inside this joint.

When the boot frame rots and weakens, more load tranfers to the side frames, and from there onto the sill assemblies. This might over-stress the joints between the side pillars and the sills, causing splits and/or screws pulling out.
One difficulty I experienced was removing the 2 large screws securing the block that helps to support the rear seat on each side of the car. These have screws that are very deeply countersunk (to a depth of about 1.5"/38mm or so). This means that you can't see them, and they are covered in debris at all times, and are hard to access with tools. Their proximity to the side frames makes it a bit cramped working with any tools. I ended up using a rachet brace and bit to slowly hand-drill the screw head, and also a hammer and chisel to break away the remains of the head. This did the job eventually, and without damaging the wooden blocks themselves.

With the wood repaired for the entire wheel-arches, I repaired the screw holes for the rear wings by plugging the damaged holes with new wood and redrilling them. I test fitted the rear wings to ensure a close enough fit. They never seem to fit perfectly, but once you can tighten the big no.12 screws, they pull up to a good fit. The small gap between wing and body will be filled up by the plastic wing piping. I have noticed that some restored ACs have rear wings that seem to be narrower than usual which might be a result of inserting them too deeply? The wing-stay bracket sets the width of the wing just behind the wheel, at about 266mm measured from the inner wing to the outer surface of the wing (that is allowing for 1mm of rubber padding between stay and wing). The front end of the wings on my AC were about 268mm measuring from the inner wing to the outside of the wing next to the wheel-arch. The width near the rear of the wings, I measured to be 255mm at a point 725mm behind the rear axle centre line (measured near the bottom edge of the wing).

For the earlier cars with a fixed side window, the rear corner can be a weak point in terms of wood rot potential. This corner needs to be sealed up with glue, following repairs if necessary, otherwise rain water may seep in. On my AC, the rear fixing brackets for both side windows had apparently broken off during the car's manufacter and they had not bothered to repair them. This left the rear of the windows a bit loose. If you do have to repair the wood at this sharp corner, you will find it a tad awkward! It is a complex joint, with gaps and recesses around it.


The side window should be test fitted. There is usually a packing piece underneath it. It needs to be an accurate fit around its upper edge (against the cantrail) as there is no rubber seal fitted there to hide any slight errors. It should be a good fit along the bottom edge too (see photo below), so that the rubber seal can keep out water effectively.

The joints between the side pillars and the sillboards, and also the hinge pillar to sillboard joints, should be checked. The original glue may have given up altogether, especially if there are gaps around the joints. The photo below shows packing pieces that I added to fill two gaps, while the photo further below shows some original packing pieces. This joint needed completely reluing.


Shelf assembly
While renewing the rear shelf plywood panel, you can attend to the surrounding timber assembly. At each end are 3 components. The upper 2 are screwed together (the screws being hidden by the 3rd part). The lower part is nailed from underneath which was not good practice. This part tends to come away, but is virtually impossible to remove unless it has rotted. I used a screw at its rear end, rather than nails, but one can't gain access to fit either nails or screws to its front end. So, one may have to rely upon gluing, plus a single screw at its rear end?


Below, you can see the new shelf end piece in place with the new shelf panel.
The lower edge of the rear window surround tends to split away due to the compound curvature. Small parts of mine were missing and more of it was splitting, so I glued it down and glued a few small pieces on to provide a good edge for folding the body panelling over. The corner pieces were only glued and not screwed, and water ingress had released the old animal glue on my AC. The more modern adhesive should cope much better. These corner pieces are very hard to clamp into place, but since they needed packing pieces at each end to plug small gaps, I made these tight enough to wedge these components into position while the glue set.


The joint where the cantrail meets the shelf assembly, has a reinforcement block that is nailed on. In the interests of making the roof frame strong, I would recommend fitting screws. The joint shown below was loose due to gaps and failed glue, while the nails were not adequate to hold it. I inserted packing shims and glue and added screws.

Finishing
The interior had originally been painted over with bitumen, after the bodyshell had been installed. Bitumen is water-proof and therefore not ideal for this woodwork. To remove, I bought some expensive clogg-resistant coarse abrasive paper, and this stripped it off. A light sanding followed with 340 grade paper to prepare for painting. I then painted the wood frame starting with an aluminium primer which is suitable for using over bitumen residue and also can soak well into dense hardwood. Then a one-part polyurethane undercoat and top coat. At least two coats of each of these three paints and a light sanding with 340 grade paper (used dry) after the final undercoat. I chose a light beige colour for the wood. Black is the more common colour used, but I wanted something pale so that one can see into all the recesses easily to make working on the car easier. This will aid installation of trim and fittings, and later on will help with cleaning and maintaining the underside of the car when it is back on the road. I choose beige because it is close to the interior trim colour, and is less likely to show through the flock coating in the boot.


A useful bonus of painting in a pale colour is that it shows up cracks in joints and also any gaps in those hard to inspect joints underneath the car.
<< Page 4 ****** Page 6 >>
